Showing posts with label recipes. Show all posts
Wednesday, January 28, 2015
Routine once more
I love the routine of school term time, I flounder a wee bit over the Summer holidays. While others enjoy the slow pace and no pressures of the holidays I find I tend to relax a little bit too much. Days blur by with not much achieved and I feel like wasted chances and time have passed me by. I'm an active relaxer for sure!
Today marks the end of my Summer holidays, back to work tomorrow for me. To cheer myself up I made the Chocolate Weetbix Slice Kimberly from Creative Chaos posted earlier in the week. When I am planning the weekly baking it's normally something that I don't like to much so I don't snack on it all the time! Chocolate chip cookies are a big favourite of everyone here except me so they normally top my baking list. But as variety is the spice of life, so slice it is! It's delicious and everyone seems to like it so not much chance of me having the chance to snack on it!
In case you are wondering the plate is by Crown Lynn the design is Yucatan by Robert Drake.
Labels:
recipes
Tuesday, October 7, 2014
Frittata - the holiday edition
"I'm hungry" If I had one dollar for every time I heard this in the school holidays I'd be rich! It seems no amount of food will quell their appetites. By the time grocery day comes around it becomes harder to come up with snacks that will satisfy. But these frittatas seem to hit the mark and the recipe is so super easy the kids can make them too. It might just help out with that other all too common holiday phrase "I'm bored", sound familiar?
All you need to do is make the base mixture and half fill muffin trays then just add in what you have to hand, this can be a real win for fussy eaters. Cut up the ingredients and let them choose what they put in! A true "mum" trick is to let them help make the food, in my experience this means they will eat the food! Or at least try it!
Empty the fridge - Holiday Fritattas.
Base mixture
4 eggs
3/4 cup milk
Grated cheese to sprinkle on the top.
Additional ingredient suggestions
Diced onion (lightly cooked till soft)
Capsicum
Fresh herbs - We used chives and Thyme
Tomato
Feta
Ham or Pastrami
Mushrooms
Capers
Olives
Mushrooms
Cracked pepper
Or anything else you might have small amounts of in your fridge and you enjoy eating!
Whisk together the eggs and the milk and half fill some nonstick or greased muffin trays. Add in any of the above ingredients to suit your taste. My kids loved this part, choosing what the put in their Frittatas, making sure they knew which ones to avoid - like my ones with the capers!
Sprinkle with a small amount of grated cheese.
Bake in a preheated oven at 180oC for 15-20 minutes, or until lightly golden and set to the touch.
If the weather is nice, take them outside once they have lightly cooled and have a picnic in your backyard. Everything tastes better alfresco don't you think? Especially in the holidays.
Tuesday, August 27, 2013
unpacked
I often find miscellaneous empty food packets in miss E's lunch box, when questioned the answer is always the same, she's bought them home so I know what to buy for her school lunch.Hmm can't knock a girl for trying. It's just I really don't want to buy those reconstituted fruit gummy things that I'm assured "everybody" has except her.They seem more like a party treat, than an everyday in the lunchbox type food (if you could even call them a "food"), not to mention the price and excess packaging right?
So when I saw this recipe I thought maybe I had the answer. A fruit gummy with no added sugars (just a wee bit of honey), just a few ingredients and homemade, not supplied in excess packaging! As a bonus I had everything I needed to try it. It makes a surprising amount of wee gummy things and they smell like a warm summer's day in the berry patch! I used a mixture of frozen raspberries and strawberries left over from our summer harvest. The texture is a bit firmer than I'd like (that doesn't seem to worry the children though!) so next time I'll try making it with less gelatine. It's definitely a winner recipe and I'll have to hide the rest of them in the fridge as they are disappearing fast.
You can find the recipe for healthy fruit snacks here. Let me know if you try it!
Labels:
recipes
Monday, July 8, 2013
for love
The weather yesterday was amazing for this time of year, shorts and T-Shirt type weather in the middle of Winter! The kids and I made the most of it, spending many hours in the garden, the poor neglected garden.
We discovered some potatoes to add to our dinner, there was a flurry of little hands finding "eggs" as one of them decided. I think possibly dinosaur eggs by the overheard conversation.
I received many compliments for my ginger crunch the other weekend. Many requests for the recipe followed so I thought I'd share it here (it's not really MY recipe either). I had to make a batch especially to photograph to accompany this post, so for the love of you dear readers, my family and I will suffer through eating this batch. I hope you appreciate all I do for you!
The recipe I use is a Jo Seagar one. You can find the recipe for wholemeal ginger crunch here. I use a tad less sugar in the base, I also use Ceres organic crystallized ginger for the base. It has the most amazing ZING compared to other crystallized ginger, I think it makes all the difference. The recipe is from "A Treasury of New Zealand Baking". It's an amazing baking book, each and every recipe I've tried is a winner. Enjoy!
Sunday, June 16, 2013
ducklings - a recipe
"mum can you make those ducklings again?"
"um, what ducklings? and it's mum can you make those ducklings again, PLEASE"
"those ducklings you made the last week for pudding, PLEASE"
"Oh, you mean dumplings!, um, yes I suppose so"
We seldom have pudding, but over Winter seldom turns into about once a week, it's something about the cold weather and a cooked pudding that seem to just go together don't you think? So here you have it, the recipe for golden syrup dumplings! * just to make it clear, I've never served my family ducklings!
Dumpling ingredients
1C flour
1t baking powder
1T caster sugar
2T melted butter
1 egg
2T water
Syrup ingredients
1C water
1/2C brown sugar
3T golden syrup
1T butter
Combine the syrup ingredients in a microwaveable jug, I use a Pyrex glass bowl. Cook on high for 3 minutes, stir and cook again for 3 minutes. If you don't have a microwave you could heat the syrup ingredients on the stove top in a pot, it needs to be near boiling.
Now to make the dumplings: Mix flour, baking powder, sugar and butter together in a bowl, then add the egg and water. Mix gently to make a soft dough.
Drop small spoonfuls of the dumpling mixture into the hot syrup, cook on high for 30 seconds - 1 minute, till cooked. Cook in small batches, 3 or 4 at a time. Again, you can do this on the stove top too! Once cooked remove them from the syrup and serve with whipped cream or ice cream! Watch them disappear!
"um, what ducklings? and it's mum can you make those ducklings again, PLEASE"
"those ducklings you made the last week for pudding, PLEASE"
"Oh, you mean dumplings!, um, yes I suppose so"
We seldom have pudding, but over Winter seldom turns into about once a week, it's something about the cold weather and a cooked pudding that seem to just go together don't you think? So here you have it, the recipe for golden syrup dumplings! * just to make it clear, I've never served my family ducklings!
Dumpling ingredients
1C flour
1t baking powder
1T caster sugar
2T melted butter
1 egg
2T water
Syrup ingredients
1C water
1/2C brown sugar
3T golden syrup
1T butter
Combine the syrup ingredients in a microwaveable jug, I use a Pyrex glass bowl. Cook on high for 3 minutes, stir and cook again for 3 minutes. If you don't have a microwave you could heat the syrup ingredients on the stove top in a pot, it needs to be near boiling.
Now to make the dumplings: Mix flour, baking powder, sugar and butter together in a bowl, then add the egg and water. Mix gently to make a soft dough.
Drop small spoonfuls of the dumpling mixture into the hot syrup, cook on high for 30 seconds - 1 minute, till cooked. Cook in small batches, 3 or 4 at a time. Again, you can do this on the stove top too! Once cooked remove them from the syrup and serve with whipped cream or ice cream! Watch them disappear!
Labels:
recipes
Thursday, February 14, 2013
Rose
Melissa of Tiny happy shared a recipe for Turkish Delight on her blog recently, it's something I've always wanted to try making - I was inspired! I visited my local "mini mart" it's filled with all sorts of exotic things , they had, the rose water needed of course. The man there always seems to convince me to buy some pistachios at the counter, it's always worth it, they are the best pistachios around, freshly roasted and taste a million times better than supermarket ones and some of them actually get home to share (ok that's sometimes true). The Turkish delight was super easy to make and even my husband is converted (after protesting that he didn't like it and didn't want to try it, hmmm). I probably should have taken a photo of it before the hungry hoards, and my creative fibre group had taken the best looking bits, I did actually cut some nice square pieces, promise. It's amazingly soft and tastes so good, like "velvet roses" I've been told.
I found this vintage house dress/coat today on the $0.50c rack, it's quite stunning cotton fabric. The roses have that "hand painted" look and it's in excellent condition, score! I love the faux wood grain look.
Wednesday, February 6, 2013
fudged
I spotted this recipe for Primal Fudge the other day on this lovely blog Cornflower Blue. You can find the recipe here. It's kinda yum! Well my husband is a big fan and the batch I made disappeared very quickly. It's no bake and really easy to make. The ingredients are simple and you just might have all of them in your pantry already, honey, cocoa powder, coconut oil, vanilla and a nut butter - I used peanut butter. I just had ordinary cocoa in the pantry so mine don't look as dark or rich as the other ones pictured but they were still yum!
On another note Sarah from the Trinity Loft is conducting a wee survey, it only takes a minute or so to answer and she'd love to hear your opinions so if you have a minute I'd appreciate you popping over to fill it out! Thanks - I know you lovely readers are good like that.
Labels:
recipes
Thursday, December 6, 2012
gifting
There is a fair bit of gifting going on here at the moment. A last minute decision that this would be the last week of pippins sent me in a little panic, as I thought I had another week up my sleeve. I have wanted to try some peppermint bark ever since I saw it on the Soule Mama blog here way back in 2009. The recipe that she used was from here. I used Whittaker's chocolate (white and the darkest bitter one that you can get) a large block of each, which meant that the "dark" chocolate layer was double what the recipe stated. All my taste testers agree that it's YUM!
I mod podged some Christmas paper over the lids of some jam jars and finished them off with some red twine. Hopefully the pippin leaders - Fern and Granny Smith agree that peppermint bark is YUM too!
Labels:
recipes
Tuesday, October 23, 2012
slow progress
| (puzzle mr A and I did in the holidays - he's 3 and puzzle mad!) |
| (our favourite side dish at the moment - recipe below) |
| (wash cloth stack - growing!) |
| (carding) |
We have been making this cauliflower side dish lots lately. It seems the WHOLE family love it! I love it not only for it's taste and the fact that EVERYONE will eat it but it's easy as well.
It's based on a recipe I saw on Pinterest. Preheat your oven to 180oC. Cut the cauliflower into florets, or chunks. Toss in a small amount of the oil of your choice. Lay on some baking paper on a tray and pop in the oven. Bake for around 1 hour. Turn a couple of times within that time. The cauliflower should go brown in places and a bit crispy. Sprinkle a little bit of sea salt and serve! Enjoy!
Labels:
recipes
Wednesday, June 6, 2012
butter
I've been trying hard to do some real life "pinning", one such project is - wood butter. You can find the recipe here. It's gives new life to your wooden objects and it really works! The recipe is simple enough - bees wax and mineral oil. First problem here in NZ is we don't call it mineral oil, after extensive research and lots of questions at the chemist, turns out we call it paraffin oil, or liquid paraffin. Once I knew it's "NZ" equivalent it was much easier to track down, although we don't seem to sell it in such large quantities. The bees wax I found on Trademe, there is a whole heap of choices there and I chose a yellow block type one, rather than the white little pellets, just because they seemed more like bees wax to me.
Melt the bees wax and warm the oil, mix together and your done - simple. Now I have seen other recipes around that use olive oil, but I know that olive oil goes rancid and it's not advised to use it on your wooden objects, best to spend a bit more and use paraffin oil.
It was hard to get a good picture of the result today, grey and overcast. But trust me the results are really amazing, I kind of went crazy going around looking for more things to polish! The above bowl I picked up at the Salvation army, it looked like an unfinished wood turning project. It's Rimu and it's lovely now it's all polished up.
I filled one jar with the wax and had a little left over and I dropped a few drops of lemon oil in it. I really wish I had added it to the whole batch as it really smells devine.
Ok - A little update and some details I missed. - I used "Home Essentials" brand of paraffin Liquid sold at my local chemist. You can find the Home Essentials website here. They have a list of stockists to help you locate a local store.
- I've also just spoken to a helpful man from Home Essentials and he assures me that the paraffin liquid is food safe, so the polish or "butter" is fine to use on your chopping boards and wooden spoons.
- The liquid paraffin is sold in 200ml bottles so you need to add 48g of bees wax to keep the same ratio as the American recipe. the bees wax I had was in 50g blocks so I just used one of those.
Melt the bees wax and warm the oil, mix together and your done - simple. Now I have seen other recipes around that use olive oil, but I know that olive oil goes rancid and it's not advised to use it on your wooden objects, best to spend a bit more and use paraffin oil.
It was hard to get a good picture of the result today, grey and overcast. But trust me the results are really amazing, I kind of went crazy going around looking for more things to polish! The above bowl I picked up at the Salvation army, it looked like an unfinished wood turning project. It's Rimu and it's lovely now it's all polished up.
I filled one jar with the wax and had a little left over and I dropped a few drops of lemon oil in it. I really wish I had added it to the whole batch as it really smells devine.
Ok - A little update and some details I missed. - I used "Home Essentials" brand of paraffin Liquid sold at my local chemist. You can find the Home Essentials website here. They have a list of stockists to help you locate a local store.
- I've also just spoken to a helpful man from Home Essentials and he assures me that the paraffin liquid is food safe, so the polish or "butter" is fine to use on your chopping boards and wooden spoons.
- The liquid paraffin is sold in 200ml bottles so you need to add 48g of bees wax to keep the same ratio as the American recipe. the bees wax I had was in 50g blocks so I just used one of those.
Thursday, April 12, 2012
bonco
I spotted these two baking tins at a local thrift store the other day. I very nearly left them there, they looked really rusty and dirty. I naively thought no amount of cleaning would improve them, you see I mistook all the dirt for rust as it turns out. I knew that Bonco tin ware is quite a hot collectible though, and I've never, ever seen trays with ferns on them!! So I just couldn't leave them there. Once I was home I thought I'd have a little go at cleaning them up. I've only cleaned one so far, the left one in case it wasn't clear! The photo doesn't really do the transformation justice! But after around half an hour of steel wool rubbing a nice tray emerged, with no rust and almost all the marks disappeared and it's quite shiny and new looking too!
I'm thinking (and I could be totally wrong) that they are possibly trays for cinnamon oysters? I hope so because that's a recipe that I've always wanted to try. What to you think knowledgeable blog readers? I won't be in a hurry to pass up baking tins at the thrift store again either, now I know they can clean up nicely with a bit of elbow grease.
The buns pictured are unrelated to the tins, lovely Dee posted the recipe today and I just happened to have some left over mashed potato and the kids and I whipped these up for our afternoon tea. Perfect activity for the school holidays and a rainy, cool afternoon. Do try them, they are easy and yum!
Tuesday, March 6, 2012
when good pins go bad
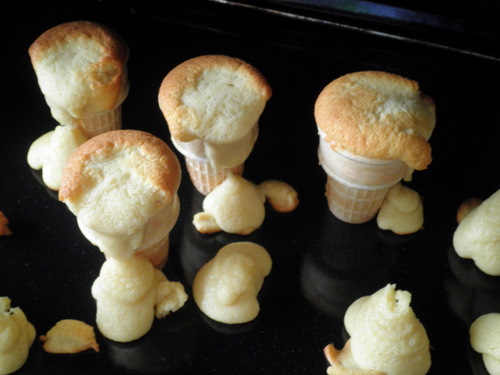
I had seen some cool cupcakes on pinerest some time ago, cooked in ice cream cones. Miss E was having a little party on Friday and at the last minute I thought I'd give them a go. I had read the instructions when I first "pinned" the recipe, but in the last minute rush of getting ready for an afternoon party I didn't get a chance to re-read the instructions. Mistake right there. OK that's a bit dramatic cause as you can see from the top pic they did turn out OK. But when I checked on them in the oven just 5 minutes before they were due to be ready I was greeted with the above sight! Arrgh! But you know what?
1:Butter cream hides lots of baking mishaps
2: A photo from the front won't show the world how the backside doesn't look so good (not good at all)
3: Kids won't notice and gobble them up anyway (leaving minimal crumbs too, big benefit of the cones)
4: You'll feel a lot better about how they turned out after they have all been eaten and you get some sleep
5: Reading the recipe always helps especially the part about what level to have the mixture
I did try another pin today and I followed the recipe instructions this time. Slow cooked honey sesame chicken! Yummo! I only had around half a cup of honey though, not the cup that the recipe suggests and I added a few extra thighs in the pot too. There was still plenty of sauce to cover the extras and it's been suggested that I make it again soon. Now that I can do.
Labels:
recipes
Monday, February 20, 2012
pinned
Lemon and poppy seed pancakes for the recipe click here, the Pinterest ones look amazing, but I was sure mine although not as pretty, tasted just as delicious. Yum, yum, yummy!
(I never buy buttermilk especially for recipes that call for it like this one. I just add some white vinegar to the milk. How much vinegar I hear you ask? Well, it's not too accurate but until it starts to look curdled, it's about 4 tablespoons to 2 cups of milk)
Labels:
recipes
Wednesday, December 7, 2011
sweet
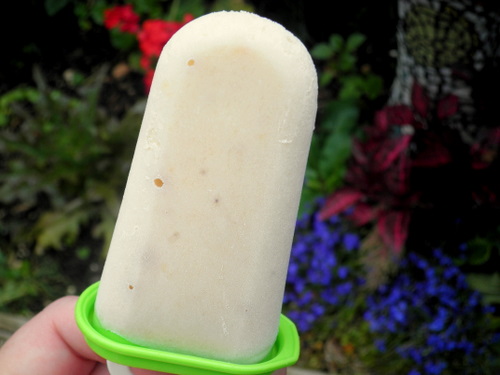
After making the banana/nutella iceblocks it got me thinking of other banana combinations. I tried banana/apricot yoghurt/maple syrup (a tiny bit) combo with great success! Well my taste testers certainly didn't have any complaints! Yum!!!
I made some apricot and orange balls this week too. A nice sweet treat that you can keep in the freezer for months (if they last that long). Great for popping in a tin or nice jar as a Christmas present.
Apricot and Orange balls
250-300g of dried apricots chopped roughly
rind of 1 orange (peeled off with a vegetable peeler)
2 Tablespoons of orange juice
1/2 or 1/4 cup caster sugar
1 3/4 Cup coconut
In a food processor chop the orange rind and caster sugar. Add the apricots and orange juice and pulse till the apricots are nice and small. Add 1 cup of coconut and pulse. With wet hands shape into little balls, and roll in the remaining coconut. I keep mine in the fridge or freezer until I'm ready to gift them (or eat them!!) YUM!!!
Labels:
recipes
Wednesday, November 30, 2011
life changed?
Life changed? Well I'm not sure but it certainly is a yum recipe. It started with this pin, you can find the recipe instructions here, although it is really just two ingredients mixed together. 6 Bananas and 1 cup of Nutella, in a blender and popped into the freezer. Now I must explain that when I pinned it I thought it would be something that I would try in the future sometime (seemed a bit decadent and indulgent), but a couple of things happened. First we got a several large bunches of bananas delivered in our fruit/vege box and then Nutella was on a super special so it just seemed the right time to try it. All I can say is YUM!
Labels:
recipes
Monday, August 8, 2011
citrus love
Natalie's magic orange cake
1 whole orange washed and chopped roughly
125g melted butter
1 C sugar
2 med/large eggs
1 1/2 C flour
1 1/2 t Baking powder ( or 1 1/2 cup of self raising flour)
Preheat the oven to 180 oC
Put all the ingredients into a food processor, yip that's it.
Pour into a cake tin or loaf pan or muffin pans. Cook until springs back when touched. I've found that is around 35 mins for a cake or 15-20 mins for muffins.
You can ice it or drizzle some orange syrup over it or leave it plain. I have made it with a grapefruit instead of a orange and it was nice if you like a tangy muffin. I've also made a version with a cup of grated carrot in it and some raisins as muffins for the school lunchbox. It seems to freeze well too! Yum!!!
Labels:
recipes
Tuesday, June 14, 2011
red & green
So that's the red and the green is the spinach smoothies that we have been enjoying. The lovely Hannah from Craftykin shared the recipe on her blog and we have been enjoying them ever since. Super duper yum and a great way of getting more greens into all of us, even if they don't photograph well.
Labels:
recipes
Wednesday, April 27, 2011
today
Labels:
recipes
Monday, April 25, 2011
over
Hope you had a good long weekend friends.
Labels:
recipes
Thursday, February 3, 2011
family favourites
Part of my collection includes some of those great books that have been compiled by a school or kindergarten or similar group. They are filled with the best family recipes and often have names like "aunty linda's tea cake". Over the last few weeks I've been trying some of the recipes. What I've discovered is most often the recipes haven't been proof read, the instructions often say add this or that and this or that isn't even listed in the ingredients! So with a bit of frustration I've been whipping up all sorts of "family favourites".
One which caught my eye was a custard square recipe that is made out of Huntly and Palmers cream crackers, have you ever heard of it? I had tried them once before, a girl I used to work with bought them in for a shared plate one day. I thought they were delicious but never thought to get the recipe. So it's pretty basic, lay out the crackers in a square cake tin, I discovered that I don't have one and used a sponge roll tin instead. This wasn't totally ideal as the next part is to pour over the custard (made as per packet instructions plus an extra tablespoon of custard powder) and they slid apart a little bit and the custard part wasn't as tall as I'd hoped. Once you have a layer of custard over the crackers, add another layer and pop them in the fridge overnight. The crackers soften and form a pastry. Then you can add an icing, I made a vanilla one but chocolate with some coconut sprinkled on is another option. Cut into squares or fingers to serve. They disappeared pretty quickly here!
The one book that I like the most belonged to my grandma, it's from 1983, called family favourites and was compiled by the N.Z.M.K.S. - or the New Zealand Machine Knitters Society. Many of the recipes say how quick they are so you please your family while you knit. What a great idea.
Labels:
recipes
Subscribe to:
Posts
(
Atom
)