Thursday, March 27, 2014

Grandma, me and Dee


I contacted Dee for a special custom doll a wee while back. My Grandma made my sister and I dolls when we were small, they were big, their limbs were long and they were stuffed so hard! I have memories of their heads feeling like rock. They had beautiful dresses and lovely shoes. As time passed they fell apart somewhat, and with their big gangly limbs were hard to store. We made the decision to keep the best bits, the clothes and shoes and carefully unpicked the faces with the hand stitched details. I also had a small piece of the original dress fabric saved from my Grandma's estate.


This is what she came up with! Isn't it fabulous! Once the doll arrived here I added a few details. I crocheted a little shawl with a shell pattern, the clasp is actually one of my Grandma's screw on earrings! As a child it reminded me so much of a cape gooseberry, it still does. My Grandma made tatted doilies and although it's not her tatting, I stitched a delicate length of tatting around the bottom of the dress. 


A true collaboration - Grandma - Me and Dee! 

Thursday, March 20, 2014

knowing me


I thought I knew myself pretty well,  for example the foods I like, the ones would be temped to try. The ones that would never pass my lips! I thought I knew my crafting style too, willing to give anything a go at least once. I've often looked at free form crochet and wanted to have a go at a crochet wrap. I started off well, and then I quickly realised that the "organic" nature of free form was just not me! How did I not know that I like things to look straight and uniform!


I gave up in disgust, it sat forlorn for weeks that then turned into months. I was so disappointed that I had wasted my precious handspun yarns in such a way (breaking off as I went along left no chance of ripping back).

It is funny how after a break things can look different, when I picked it up again last week I didn't feel so deflated in my efforts. Once some of the ends were woven in I started to like it even more. Now I'm quite looking forward to the cooler months and swinging this over my shoulders and a black top. It's turned out much more uniform than "free form" but it turns out I'm not a "free form" gal after all.

Sunday, March 2, 2014

floral tote - a tutorial


I love vintage sheeting, whenever I use some I find it hard to throw all the small scraps away. I'm planning a scrappy type of quilt (*read - long term project), but I'd thought I'd come up with a quick and easy idea that would see me using some of my scraps up a little sooner.

Welcome the - Floral Wreath Tote!

If you want to make one too you will need the following:

- Scraps of fabric with flowers/leaves, could be sheeting or any other floral fabric that takes your fancy.
- Visoflix, or Heat n bond I think it's also known as.
- Fabric for the tote, I've used a hard wearing denim
- Fabric for the lining, I chose some vintage sheeting and a plain cotton.
- Iron
- Sewing machine

Cut the following from both the main fabric and the lining:

Front and Back : 40cm x 35cm  -   2x main fabric 2x lining
Sides: 40cm x 14cm  -  2x main fabric 2x lining
Base: 35cm x 14cm  -  2x main fabric 2x lining
Handles: 60cm x 10cm - 2x main fabric or contrasting fabric.


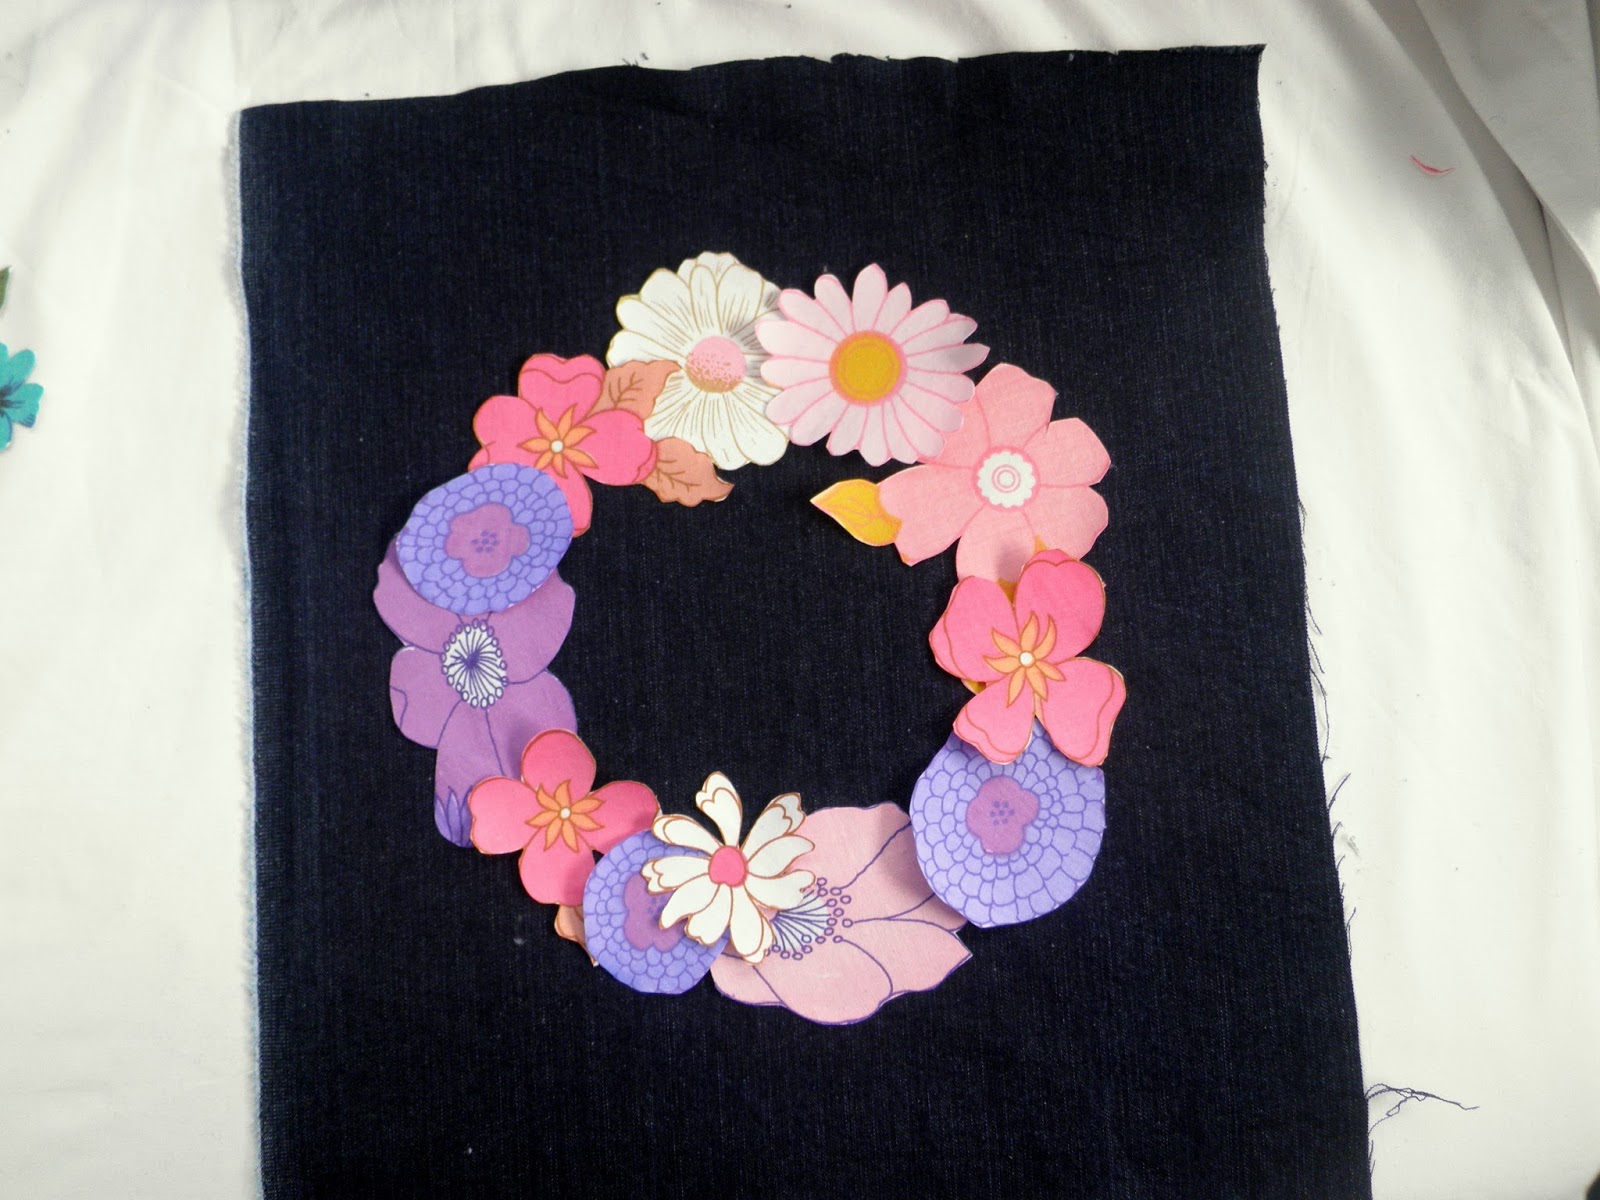
I started by cutting out my floral scraps close to the blooms.  I didn't cut them too close to the edge, making sure there was a margin of fabric around each bloom.


Cut out a piece of Visoflix to the same shape as your cut blooms. Pop a piece of baking paper over the Visoflix and your fabric when you iron it, you don't want any stray sticky stuff on your iron!

*Little tip-  If you are doing a lot of little pieces like in this project, write "top" on the corner of the baking paper to let you know which side has been facing up!


Once all your pieces have Visoflix on the back, cut them out. If you have blooms that overlap, just cut them to a petal shape that suits the rest of the flower ( as the bloom above). These will be covered up in the next steps.


Once all your pieces are cut out, try laying them out on the front piece of fabric. I used a lot less than I thought I was, I limited my palette and put aside the blue ones for another project. I made sure any overlapped petals were covered up by other blooms.


Once you are happy with your design, peel the backing off the Visoflix. I changed the final design a couple of times! It might help to have a pin or make in the center and build your wreath design around it.


Carefully iron the design down, try not to move the pieces as you iron.


Once it's all ironed down we need to add some stitching to keep it all in place. A little free motion stitching is the way to go. You might need to get your machine manual out to see if you need a special foot. For my machine it's as simple as dropping the "feed dogs" and removing the foot. If you need a tutorial or more information check out this free motion tutorial by Jennie of A little vintage.


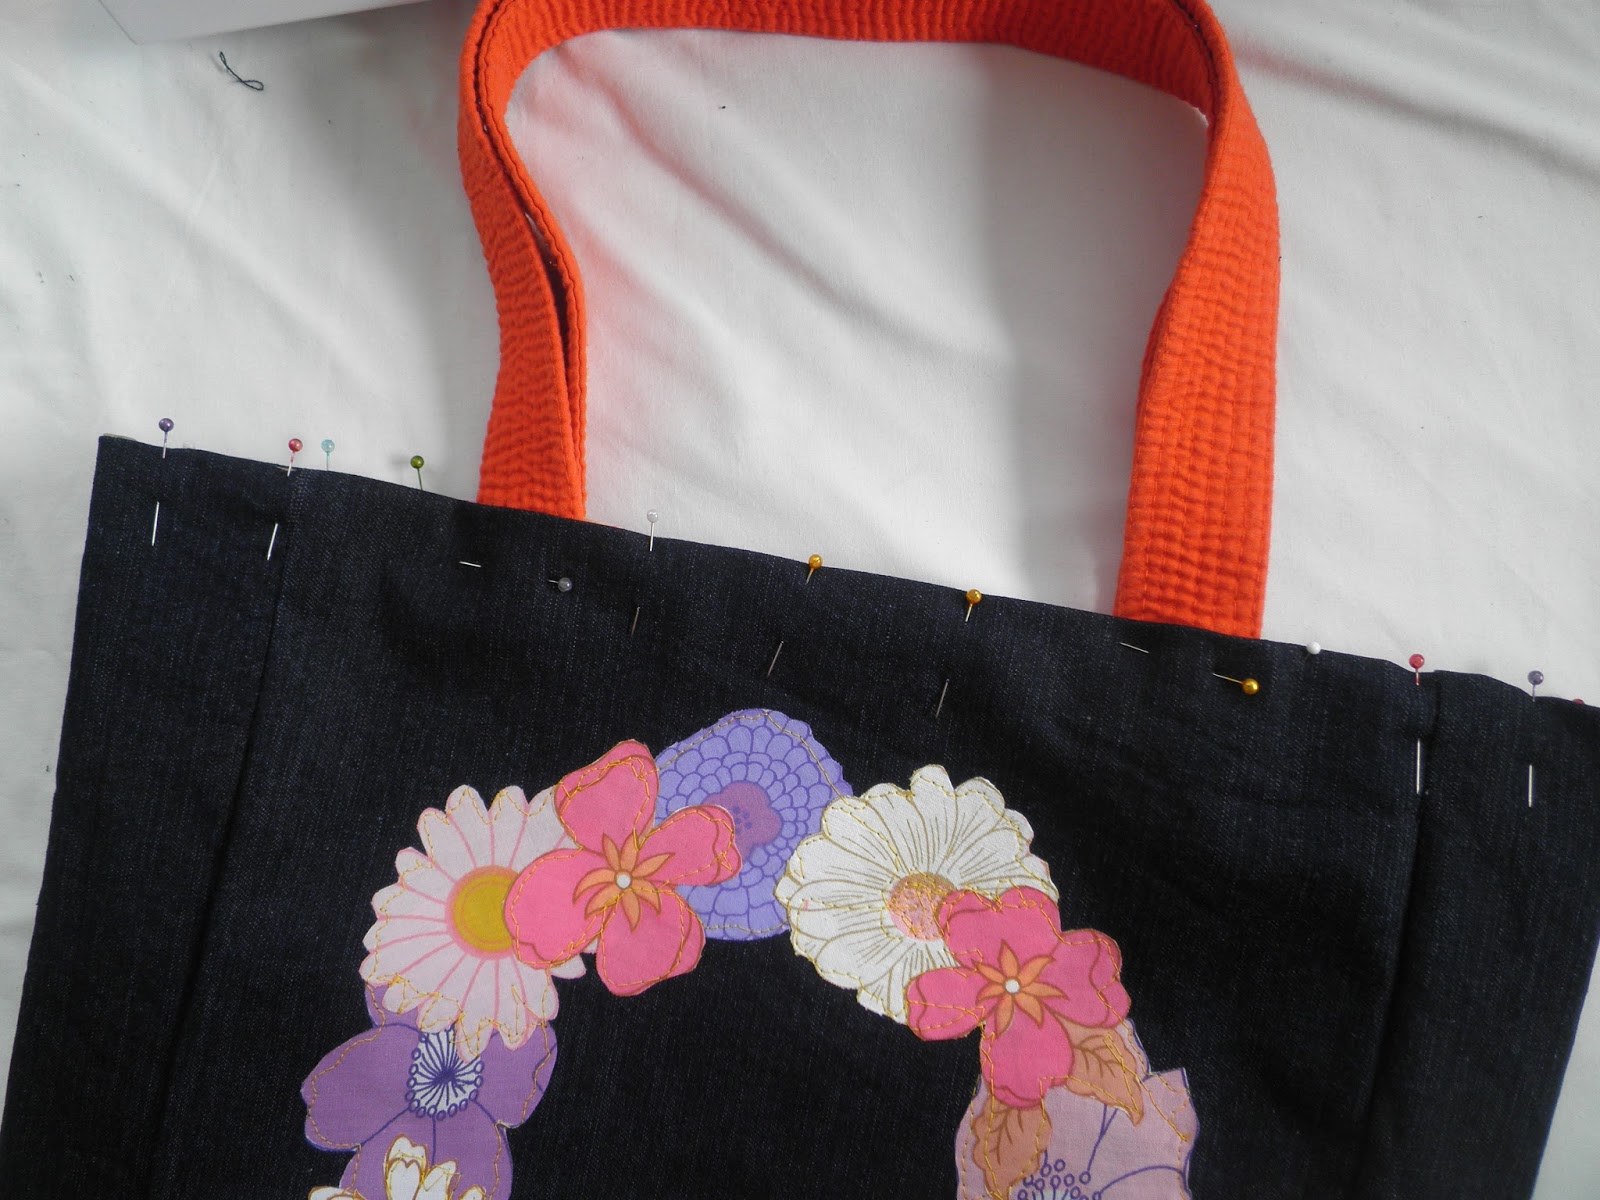
I chose a contrasting thread and stitched around the outside first. Then I went back and stitched around the inner edges, also hitting all the overlapped bits. It doesn't have to be perfect, mine is far from it! The main idea is just to catch the edges so the florals don't fall off in the future. You can be as arty as you like!


Even with contrasting thread, the stitching doesn't really show up much  from a distance.


Now that the front is finished it's tote making time! The following steps are the same for both the main part of the bag and the lining.

Right sides together stitch the front and back pieces to the base. I've used a 1cm allowance throughout, it doesn't really matter what allowance you use, as long as you are consistent.


Then stitch the sides on. I find it easy to do this if the sides are on the underside and the previous stitching on the base is on the top. I sew only until I hit that line of stitches (pictured below). Don't stitch past that point or it's hard to sew the sides up.


Stitch up each side. Matching edges as you go.


Turn over the top,  around three centimeters and press. Do the same for the main part of the of the bag too. Turn the main part out the right way.


Slip the lining inside the main part of the bag, matching side seams, pin all the way around.

Make your straps. Right sides together stitch along the long edge. Turn right side out and top stitch, leaving the short edges raw.

I've actually used a thrifted Tae Kwan Do belt for my handles! Keep a look out for them, they make great bag handles. You could use a thrifted belt too.

Slip the handles between the main part of the bag and the lining, make sure they are around 5 cm below the edge. Pin. I have placed the handles around 5-6 cm from the side seams. Once pinned check the handles are both the same length and have no twists in them - a past mistake I'll never make again *wink*


Top stitch around the top. Check to see that you've caught the lining with your stitches and the handles are secure, then do another row of stitching to make sure those handles are stitched on nice and strong.


That's it! All finished! Prepare for compliments a plenty, jealous cries and pleas of "please make me one!"

Don't be limited to totes and florals, this technique could be used for animals, geometric shapes, to embellish cushions and zip purses, even quilt blocks if you have the patience!

I'd love to see yours if you make one!

Friday, February 21, 2014

Lego love - the party edition


We celebrated a 5th birthday here last weekend. It was a very bleated party, with the real birthday being in early January. But with lots of little friends away on holiday during that time, it made sense to celebrate a bit later.

I've long wanted to host a "Lego" themed party, we are a Lego loving family. Lego is the single most played with item in our house, played by family members young and old. I did a little Internet research for party ideas, adding some to this Pinterest board - Lego party ideas. I wanted to keep it fairly simple and easy to prepare keeping in mind a budget too, I do believe you don't have to spend a fortune to have a fun and memorable party.


I kept the cake simple (it was his third cake!) butter-cream icing and some stack-able Lego lollies that I bought from Crazy Candies. They stock an impressive array of confectionery mainly imported from the USA.

We kept the menu simple too, but I had spied this amazing Jelly recipe a while ago and was keen to give that a go. You can find the recipe for Glass block Jelly here. If like me, your country doesn't have sachets of gelatin, each sachet mentioned in the recipe is equal to 2.5 teaspoons. I was so impressed with how it turned out, as were the guests! Not to mention it can be made ahead of time, always a winner in my books.


I bought a Lego silicone mould off Trademe and poured melted crayons in it for take home gifts. Along with a printed Lego colouring in book. We also spent an afternoon in the school holidays making polymer clay (Fimo)  pendants, squishing the clay into the moulds. It was a fun activity that even the youngest member of our family could take part in.


I printed off some little Lego guys and hid them around the garden - "I spy a Lego guy". Super easy and the kids had a blast trying to find them. I set them a task of finding three each, although I'd hidden many more, just in case some went astray.


Simple white bags were transformed with printed Lego guys and washi tape, other than the colouring in books and crayons I included a small bag of the Lego candy and the Lego pendants.


We greeted the guests with VIP tags, attached to a lanyard so they could wear them easily during the party. There were five activities planned so I added some little check box circles at the bottom to mark them off as we did them. Once all the activities were competed each child could have their goodie bag. It was amazing how enthusiastic they were about getting their passes marked off and asking about the next activity, it made the time go so quickly.


We had a "Lego spoon race" and we played "don't eat Pete". I printed off the game from Delia Creates and had enlarged it to A3 size, instead of laminating it, I just used washi tape to attatch it to the table. Don't eat Pete was the biggest hit, probably my favourite activity of the day. It was a new game to me, but I love how you could easily make one to match any party theme.


It was such a fun party and the feedback suggests it was the "best birthday party ever" possibly a slight exaggeration, but I'd definitely do it all again!

Wednesday, February 19, 2014

sew sweet


Cat recently hosted the Sew Sweet swap, I was partnered with the uber lovely Talia. The colours that she liked were - mustard, rust and grey. Normally that palette would have stumped my fabric stash, but lucky for me, I had just stumbled upon a grey wool skirt at my local thrift store. One thrift store in town is currently having an "extended" $1 sale, all out of season stock is just one dollar! It's meant I've picked up some absolute bargains, merino tops in perfect condition, wool skirts, I won't brag too much, but I'm feeling lucky! I teamed the grey wool fabric with a little off cut of hand printed fabric that I bought last year in Christchurch, by the talented designer : In my back yard . In a strange twist of fate, my scrap bag swap partner also sent me a wee bit of the same fabric!

I made a very bad attempt at some free form sewing and popped some delicious chocolate in to hopefully make up for sewing!

I've got some plans to make a few more of these zip bags, them seem to come in handy for so many things don't you think?

Monday, February 10, 2014

a scrapin'


Make :: Life :: Beautiful

I've taken part in Nin's Scrap Bag Swap for the last few years. It's been a great way to pass on a little of my fabric collection and receive a surprise parcel in return. It's always so nice to get mail and fabric in the post, well, win/win I say! 

This years format is slightly different and also includes a blog-hop which started today! The oh so talented Juliet from Tartan Kiwi is talking about Paper piecing, I think it's above and beyond my sewing patience but Juliet makes it look easy with her beautiful patterns! 

Below is a list of the other bloggers taking part, you'll notice my name in the line up too! I'm looking forward to sharing a quick and easy scrap busting tutorial. 

Mon 10th February             Tartankiwi – Paper pieced koru
Tuesday 11th                      Make. Life. Beautiful. - Dolly Outfit
Friday 14th                         Mousehouse – Pocket Organiser

Monday 17th                      Catalina's Cottage – Hexie love 
Tuesday 18th                      Make. Life. Beautiful.  Scrappy quilt Part 1
Friday 21st                         One Paisley Apple – Fabric Flowers

Monday 24th                       Kiwi at Heart  -   Scrappy Rope Coaster
Tuesday 25th                       Make. Life. Beautiful.  Scrappy quilt Part 2
Friday 28th                          Works in Progress – Scrappy Pot Mitt and Trivet

Monday 3rd March              NZ Green Buttons – Floral Wreath Tote
Tuesday 4th                         Make. Life. Beautiful.  Childs Bike Seat Pad
Friday 7th                            Catalina's Cottage –  Giant Star Quilt

I hope that you'll follow along some of these lovely bloggers, checking in to see the amazing scrappy projects.

Tuesday, February 4, 2014

for me


The times that I sew clothes for myself are few and very far between. It seems one bad, ill fitting sewing experience is enough to put me off sewing for myself for quite some time. But ever the optimist I try my hand at it again and again.


I've been searching for a pattern for a top for a long time, searching in vain. It's pictured in my mind clearly but no pattern designers seem to have the ability to read my mind! Then, quite by chance while waiting for some fish and chips at a sea side town over the holidays, I popped my head in a little store. It was one of those little poky stores that have way too much stock for the size of their footprint and items seemed to be falling out the door. It just so happened that I found the perfect top amongst all the bric-a-brac.


Perfect pattern yes, but not the perfect top for wearing. The fabric wasn't soft and comfy, more itchy and sticky, and not to mention the colour wasn't really me. I spent an evening carefully unpicking ALL the seams, trying to carefully maintain the pattern shapes without the fabric fraying away to nothing.

The effort paid off! I made this top up quite quickly using some fabric that I dyed with Inko Dye using a doily. The rest of the fabric came from an over-sized thrifted cotton top, that I had tried to "refashion" and re-size. But although Refanshionista seems to do it with ease, it just wasn't the case for me! I was very pleased to find it was an almost perfect match for my dyed fabric.


I fixed that little bump on the bodice once I spotted it in these pics.


I'm so pleased to have finally found an easy to sew pattern that I love! I just had to go the long way around to get it!