Saturday, July 1, 2017

Twig + Tale - Driftwood


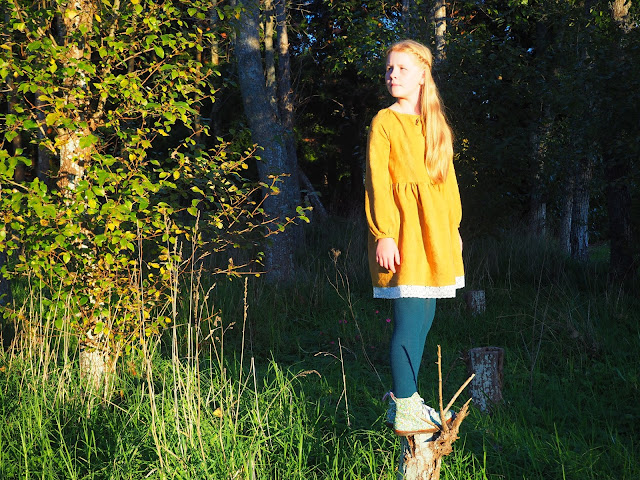
I was fortunate to be a pattern tester for Twig + Tale recently, testing this versatile pattern - Driftwood Blouse and Dress.  


I made a dress version, with long gathered sleeves. I forgot to add a little more length when I cut it out, the perfect excuse to use some cotton lace that I have saved for such a long time. The pattern calls for elastic through the waist, but I chose to leave it out. It makes for a nice loose, relaxed fit. 

There are so many options on this pattern, short and long sleeves,ruffle neckline, dress and blouse! It was amazing to see all the tester pictures coming through, each with such a different look. 

The pattern is currently on a launch special, check out this bundle it's the best way to buy it!


Tuesday, February 21, 2017

Upcycle - Twig and tale tours


I'm not going to lie, I find much more pleasure browsing racks of clothes at an op shop (Thrift store) than rolls of new fabric at a store. There seems to be so much more of a challenge in taking something and changing it into something else, than taking a big sheet of fabric and cutting it up. What started as a way of crafting while on a single income has become "my way"of crafting!


I found these fabulous flannel pants that I thought perhaps my husband would wear, but alas a bit too adventurous for him. Perhaps too adventurous for the original owner too as they were in perfect condition. They seemed perfect for upcycling. 


I set about deconstructing them, they are a quality piece of clothing and had beautiful details and trims that I carefully unpicked.

Then the exciting part, what to make?

It seems like after such a dry spell of friends having babies that there is a new wave of life coming into the world. I used to crochet most of my baby gifts, small booties and hats, I used that as a starting point when choosing something to make.

I chose two patterns from the Twig and tale website, two patterns I've never sewn before. The Wayfarer Shoes and the versatile Evergreen Bonnet (So many options!)


I forgot to take a photo of the lining fabric, but it was a soft wool vest. I added a few extra snaps on the bonnet to give it maximum wear.


I used some of the trim from the pants as little pulls for the back of the shoes, making it easier to get them off and on. I was so surprised how quickly they worked up! Such a fabulous pattern that I can see will be my "go to"pattern now to make for gifts. I'm about to make up a stash of them!

I used the wool vest for the soles and lining of the Wayfarer shoes too. I had thought I'd cut into a leather jacket for the soles, but the wool has more stretch to it and perhaps will be worn just that little bit longer. But if I was making them for older kids ie walkers I think leather would be a much better option.


I'm about to wrap up this little "Welcome to the world!", knowing my gift will be as original as the wee babe that will wear it!

My post is just a small part of a fabulous tour of bloggers and their upcycled Twig and Tale creations. You can read more about it here.

 Rafflecopter: a Rafflecopter giveaway Link up:

Tuesday, December 27, 2016

Adventures in chippy paint


 At least 3 years ago I hauled this chest home on foot from an inorganic roadside rubbish collection, I know what you are thinking, I have ZERO shame! I had my preschooler son with me and we tried to balance it on his balance bike on the walk home from preschool. He thought it was the funniest thing ever and was not at all interested in balancing it with me and zoomed off ahead of me. So I carried it home. Many stops later, (cause it's heavy) and just as I was at my driveway a car pulled up and asked if I wanted a hand! Garage space is currently at a premium and it's now or never to give it a makeover.

I've slowly been building up confidence in upcycling or making over furniture with Voodoo Molly Vintage paint. I decided that although I went to a huge effort to retrieve this piece that I wasn't worried in how it turned out, giving me a chance to experiment. Enter - the chippy paint technique!

So here are the progress shots and a quick explanation of it's transformation and final results. I'm not entirely convinced it's how I want to paint every piece of furniture I own, but everything is worth trying at least once right?!


 First step a light sand, you can easily see the difference, it was really just a light sand to remove the flaky old varnish.


As the wood was quite light I added some dark stain to the edges and other parts I might be sanding back. It also helped cover up some damage around one handle in the front.


Then I added colour to show through at the end, I used small amounts that I had left over from other projects, Green Tea, Dragonfly, Pistachio, you can find the paint here.


 Then I applied some Vintage wax with a palette knife in the areas I wanted the colours to show through, the edges mainly. It allows larger chunks of paint to peel off, leaving it looking more worn than if you just sanded back without wax.I must admit I had trouble trying to do it randomly, I'm perhaps not suited to this style of painting!


 Then a coat of white over it all! Then I just sanded back over the waxed areas.


Complete! It looks worn and weather-beaten and I'm not precious about it being bumped or knocked around, perfect style of painting if you have children!

I finished it off with a light buff of Vintage Wax to protect the surface.

If you are looking to try it, check out this quick how to video from Voodoo Molly, I love the look of brightly coloured chippy paint. Perhaps for the next blanket box I carry home?

Tuesday, October 11, 2016

Twig + Tale - A blog tour


Now you might not of heard of Twig + Tale but if you've been reading my blog for any length of time you will know of "Big Little". Big Little has gone through a little transformation and is relaunching as Twig + Tale, same great patterns just a new name and a new place to get inspiration! 

I love these patterns so much, in fact I could bore you with how much I love their patterns, but I think Twig + Tale sum it up perfectly. 


"Twig +Tale is a place where imagination runs wild and is for everyone who shares a love of creativity and an adventurous spirit—beginner sewers especially! It's a celebration of the innocence of childhood and the wonder of nature. It's about comfy clothes and warm things like hugs and capes and coats. It's about handmade, love, and imaginary play—featuring classic, simple patterns that inspire us all to tell a story".


I've long admired the Wild things coat, but the climate here means the number of days a full Winter coat are needed are few and far between. So combining the Wild Things features with the Pathfinder vest is the perfect combo, I'm not alone in thinking it is a great combo, you can actually buy that pattern combo !

My daughter decided that a fox was the "wild thing" she wanted for a vest. The very next day I spied a large woollen lightweight wool shirt at my local thrift store. It seemed perfect, I just hoped that it was going to yield enough fabric! 


Spot the tail! 

Fortunately there was just enough. I carefully cut around the pockets and reattached them in a new position. The only compromise was a join in the front of the band of the hood. 


Twig + Tale have also released a free Dragon add on for the Wild Things patterns, cool wings, tail and horns. Click here to download Free Wild Things Dragon add-on . It's super cute and might just be the next version I try perfect for a Pete's Dragon fan! 


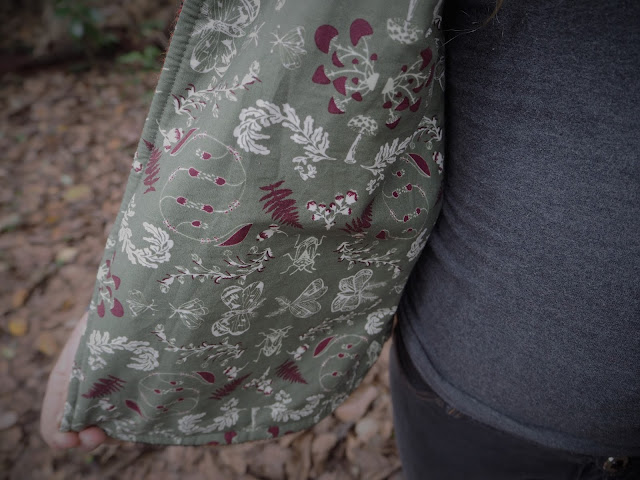
You might have noticed the beautiful lining fabric, Art Gallery Fabrics has generously sponsored the Twig + Tale blog tour. I had such a hard time choosing something from the Art Gallery Fabrics collection, so many beautiful fabrics! In the end I went with this beautiful print from the Forest Floor collection, Nature Study Ridge. I don't often work with new fabrics so it was a real treat, thank you Art Gallery Fabrics! 


What would a Blog Tour be without a giveaway!


Art Gallery Fabrics is kindly sponsoring 2 yards of Art Gallery fabric of your choice. To make the prize extra sweet, we are also adding a collection of 5 Twig + Tale patterns of your choice.
International entries are very welcome. Our bloggers come from every corner of the world to celebrate the global nature of Twig +Tale too.
Enter using the rafflecopter below.
(The winning entry will be checked to ensure all criteria are met).

a Rafflecopter giveaway

Do check out the other Bloggers taking part in the tour, I've seen their finished projects. So many stunning versions of Twig + Tale patterns and it really shows that the patterns are just the beginning - let your imagination run wild! 

make it merry!


I think most people fall into two camps, either they love the lead up to Christmas, or loathe it. I think I actually fall in the middle, though I used to love it perhaps it has something to do with how organised I am. 

A few months ago when Christmas felt a million months away, I was invited to take part in a media launch of Spotlight's 2016 Christmas range.  


The room was decked out beautifully! Just like an European Christmas market, think mulled wine, fur trees and all those good things.  It made me nostalgic for my one Christmas in Germany. There was biscuit decorating, flower arranging, gift wrapping and my "stall"of card making. The guests got a chance to have a go at creating too! So much fun having free reign with crafting supplies and I loved watching the different ideas come together.

Melissa from The Best Nest was my neighbour and came up with some easy ideas for making your presents look fab under the tree.


Now I'm armed with ideas for decorated biscuits, artful flower arrangements and handmade cards. Now just to find the energy to make it all! Make it merry!

Saturday, July 30, 2016

draws or drawers?

I belong to a couple of "freecycle" and "buy and sell" pages on Facebook. I've lost count of the times I've seen people offer up draws" for sale or for free. I get a tiny little "grammar twitch" inside every time! Yet this time it's kind of accurate, these drawers have actually been drawn on!


So this is what I started with, not great. I can see why someone decided to put them out on the roadside rubbish collection, but  my eagle eye could spot the Rimu sides and Oak fronts and the potential! They are solidly built and are perfect for the transformation I had in mind.


I nailed and glued them together off centre from each other, creating an ever so slight zigzag effect. I found some little wooden legs on Trademe and my husband helped me get them screwed in the right spot. A quick sand and filled in some Borer holes (the Borer long since departed!). It's not perfect, the sides/ends of the drawers were not designed to be viewed and I could have spent hours trying to get them looking perfect, but as an upcycled piece I don't think perfection is really a factor!


Choosing the colour for the interior panels was a tough choice, in the end I chose Voodoo Molly Pistashio with my favourite Classic White for the rest. I painted the interior first, then decided that it would be nice to keep the wooden edges of the drawers unpainted, keeping the beautiful tones of the Rimu and the lighter tone of the Oak. I finished the wood with Voodoo Molly Vintage Clearcoat (low sheen) it's waterbased and gives such a lovely finish.


I'm really glad I kept the natural wood edges, it blends in well with my Punga Vase collection and is a nice little reminder to their original state!

Tuesday, July 12, 2016

Crossroads


So yesterday I shared the Pathfinder vest I made for my son, today I'm sharing the one I made for my daughter. I find my children don't like to be too hot and the climate here means that big bulky jackets have very limited wear (if at all!). These vests seem to be the perfect compromise. I chose the longer length for both of them, keeping their lower backs warm as the climb tress and run about. 

I was part of the pattern testing group, and for this vest I chose the "Crossroads"front option. It's not actually part of the Pathfinder Vest pattern, but a free add on for Big Little Newsletter subscribers. You can sign up here. 


I've had this woollen blanket for a number of years, quite thin and a bit stained on one side, perfect to transform into a cozy vest. I chose the pleated back and I'm kicking myself that I didn't line up the darker stripe with the middle - but you probably didn't notice till I pointed it out!

My daughter has had her eyes on these buttons for ages in my stash (yes I seem to be a crafting hoarder) and they matched the colours in the vest perfectly. She arranged them artfully and I stitched them down. I love the "crossroads"front as it gives a extra layer of warmth across the chest, perfect for the windy weather. I'd quite like one in my size!


Want to make your own Pathfinder Vest? You can find the pattern here, Make sure you sign up to the newsletter to get the Crossroads front option! I can see many more in my sewing future!

Monday, July 11, 2016

Pathfinder Vest - Pattern release


I love sewing for children, not just my own, but making small clothes is so satisfying don't you think? They take very little fabric, often fast to sew and they seem to fit so much better than trying to sew for an adult body!

I recently was a pattern tester for Big Little, testing this fabulous and versatile pattern. Let me introduce you to -

The Pathfinder Vest from Big Little! 

Mix and match styles to achieve over 70 stunning combinations, for both girls and boys.

Curved Dropped back option - keep those kidneys warm
Yoked Pleated Back optionTwo lengths - Classic & Extended for extra warmthFlutter sleevePixie hood & Classic Round hoodCollarV-neck & Round neck2 Pocket stylesOptional overlapping button standNumerous options for closures!


I'm known for my love of upcycling and try not to buy too much new fabric so it will be no surprise that I made this Pathfinder vest for my son using a wool suit jacket that I thrifted for just $3.It was lovely and light weight wool, more suited to our mild climate than a thicker wool. Keeping to the thrifted theme, I used a men's shirt for the lining. I kept the original pockets from the jacket, cutting the pattern pieces out carefully. The pockets were so skillfully sewed that it seemed a waste not to use them!

In my haste of cutting out I didn't quite line the pockets up on either side, so I added some applique to hide that a little and distract the eye from my glaring mistake! The applique has actually turned out to be my favourite part! 


It was hard to choose a pattern combo from all the different options, but for this one I chose a Pixie Hood, a curved drop back for added warmth and a pleated back so it wasn't too tight and straight.

The verdict is that it's an instant favourite! We were away for the weekend and it was hardly taken off. Perfect for exploring the Red Wood forest.  He seemed quite at home like a woodland pixie.


For a limited time the pattern is on sale, you can find the pattern here at Big Little

I also made a vest for my daughter and I'll share that one tomorrow! Once I can workout how to get the photos onto my new computer.